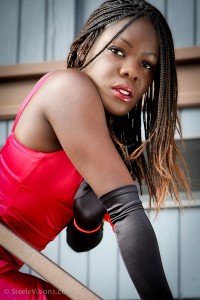
Last week I participated in a “Models and Photographers” Meetup event where I took the photo at left. If you’re an aspiring photographer, or even a pro looking to meet new models or experiment with new techniques, I highly recommend using Meetups (www.meetup.com) as a low-cost, low-stress way to get out in the field and work with like-minded people.
In my city there are at least a dozen photography Meetup groups, many of which hold events at least once per week. Some Meetups charge a small fee to help cover administrative costs, but usually everyone involved is working for trade to build their portfolios (called TFP). At last week’s meetup I found half-a-dozen would-be models and a similar number of photographers all working hard to create great images together with no financial pressure, and no expectations except that any good photos would be provided to the model afterward.
My photo above got some attention from the group, because other photographers who shot the same model in the same location did not get equally good results. They asked me to explain how I made the shot, and I happily obliged (sharing our techniques is one purpose of this group). I thought you might enjoy the explanation as well.
This was shot with natural light in the mid-afternoon, with sunlight striking the model directly from the high left side of the frame. I usually try to avoid direct sunlight on a model’s face, because it’s too harsh, but we were shooting fast and I couldn’t get a better position, so I worked with it. I had an assistant holding a silver reflector at camera right to bounce in some fill light.
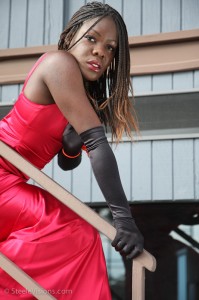
Back at home, after importing the photo to Lightroom, my first concern was the harsh sunlight on the model’s face. (See the original, un-retouched photo nearby.) This kind of hard, raking light is almost always unflattering, and the model deserved better treatment. After all, it’s my job as the photographer to put her in flattering light, not her job to be flawless in harsh light.
So, to correct for the hard light, before doing anything else I decided to apply some softening to her skin. I took the photo from Lightroom to Photoshop and applied what I call “glam blur” softening to her skin. (I won’t detail the process here because I cover it in both my headshots course and my Photoshop course.)
After that softening, I returned the photo to Lightroom, where I increased the Exposure and Fill Light slightly, then increased the Blacks to regain lost contrast.
I wanted to crop in fairly tight, because this photo is all about the expression on the model’s face. But I also wanted to keep enough of her clothing and body to make an interesting composition, and I wanted enough of the railing to keep the interesting triangular effect, so that set the boundaries of my crop.
Finally, since the background was a boring gray wall, I applied a slight vignette to de-emphasize the wall and bring the focus forward to the model.
This all took just a few minutes in Lightroom and Photoshop, but it made a huge difference in the final photo, which now looks like something planned and created, rather than just another snapshot.
That was just one of several worthwhile shots I got from this Meetup, not to mention spending a few fun hours with other photographers and models. An afternoon well spent.
And if you don’t have any Meetups like this in your area yet—anyone is free to create one and become an organizer. Even you.


Hi.
Why did you returned to Lightroom after softening her skin? Could you not have done the Exposure,Fill Light and Blacks adjustments in Photoshop as well?
Thanks and pardon my ignorance.
Happy shootings to you too.
Ernesto
Phil: Everything you describe in the post process makes sense; one question: I only use Lightroom (not PS) and find there skin softening to be pretty good. Is it really better to do the skin softening in PS? Thanks, John
@Ernesto – Yes, I could have stayed in Photoshop and made the other adjustments, I just find it quick and easy to do in Lightroom and it’s non-destructive without having to use layers, etc. Lately I tend to do as much in LR as I can and only go to Photoshop when necessary.
@John – Which leads to your question: I still prefer Photoshop for skin softening. I find I can get a more subtle effect and much more detailed control than I can in Lightroom. Admittedly it takes a bit of time with layers and masking, but for a photo I care about I find it’s worth it.
Hi
I am a member of the Pro-AM Meetup in San Diego and have had a great time learning from the Pros. We had a model shoot in November and the results were quite spectacular. Regarding skin softening, I do not use Lightroom (yet) so these results were produced using Corel Paintshop Pro.
Surprise!: http://t.co/Fg6gfqZ
Regards, Erik
Kerstenbeck Photographic Art
Great Idea Phil,.. I’ll have to check-out the meetup website to see if there are any TFP’s in my area. I get a lot of really great inspiration from your blogs, videos etc. Keep them coming Bro!
Hey there, Phil. Good article, got me thinking. Nice photo too, in fact the one right out of your camera was pretty decent too.
, there are very few photographs to would not bienfet from a tiny bit of the manipulation I write about below.I am 70 years old so when it comes to photography I have seen a lot over the years. When it came to image processing I had my own darkroom and manipulated images via burning and dodging and in some cases cropping. That is also where I draw the line with digital. I will only go as far digitally as I was able to do in a wet darkroom. The exception to that could be a white balance adjustment and sharpening because of the nature of digital images losing up sharpness because of anti aliasing filters in the front of sensors.If there were “clouds” in the image you wrote about and they needed to be enhanced through a program like Nik Viveza 2, or Nik Silver efex pro 2 or both, I consider that the same as manipulating in a darkroom. But to add clouds or anything else for that matter is in my opinion not photography.There is a very fine line. I have heard and I quote “but that is the way I saw it, but the camera gave me something different”. “So I altered the image the way I saw it.” So where does the line get crossed. For me, it is as I wrote above. It goes no further than what I could have done in a darkroom which consists of paper type, chemistry type, burning and dodging tools, film type that was used and chemistry used for that film. All of those things can be done to a certain degree in a program like Lightroom 4.4.Even worse than adding clouds, which was wrong, are photo journalists today altering the meaning of a photograph adding or taking out people or things or changing the look of the location to make the image say things that were not real. Many photo journalists in the past few years have been caught with their pants down and taken to task because of their image additions or subtractions.Elliot Stern