I love seeing students of mine become highly successful photographers, so here’s a story I just had to share with you.
I got an email a few weeks ago from a former customer who wrote:
“This is Christopher Descano. About a year and a half ago I purchased your portrait course online. I have taken your advice and teaching to heart and I have slowly progressed to the number one headshot photographer in Philadelphia.”
I immediately thought: A year and a half to go from novice to the number-one headshot photographer in a big city? That’s impossible! (Turns out it took him closer to three years. But still…)
Then I took a look at his website. Wow! Now I believe it. He is doing great work!
It always thrills me (and humbles me) to see a former “student” doing better work than I have ever done. Not only are his headshots absolutely top-notch, we can all learn a lot from the way he is running his business.
I wrote him back to see if I could share his story with you. Here is what he had to say:
How did you decide to become a photographer?
I’m a professional actor by training, and as soon as I realized that it was impossible to get a New York or LA caliber headshot in my hometown of Philadelphia, I knew it was time to become a photographer. There was a void, and I saw this as a business opportunity which I could couple with my love of photography.
After I returned home from finishing my training to become a professional actor in England, I had my head shots taken locally in Philadelphia, and I was disappointed, to say the least.
I then had them redone in New York, and they were better, but the price was astronomically higher, about $600 per session. That’s about three times as much as the going rate in Philly. In my opinion, that’s a lot to ask of struggling artists just starting out.
So I started to shoot some of my actor friends for free, and consequently they started using those headshots as their main headshots professionally. They received excellent feedback from casting directors, which in turn was passed along to their agents. Their agents started to contact me directly to shoot more of the talent they represented, and that’s how the ball kind of got rolling for me to shoot professionally full time.
How long did it take you to go full-time as a photographer?
Let me be clear, this process did not happen overnight. I would say conservatively that it took about a full year for me to make the switch to do this full-time. I was extremely proactive in making connections, networking, and just simply getting my name out there.
There was already some very well established photographers doing headshots in Philadelphia, so I knew that I had my work cut out for me if I wanted to be successful.
How important is your website for getting new clients?
I think having a great website is one of the most important factors of being a professional photographer. It really only comes second to having great photos.
Also, having a properly constructed website from the back end is mandatory from a SEO standpoint. It’s very important to make sure that your website is functioning properly from the inside out, and not just the exterior. Having a visually appealing website aside, if you’re not showing up in the search engines then what’s the point? It’s no fun being on the 10th page of the search results, so study SEO and figure out what the factors are that can cause your site to rise in the search results. It’s not rocket science, but it takes time, effort, and consistency.
Tell us how you shoot your photos
When I shoot subjects outside, 99.9% of the time I shoot them in shade. Sometimes I use a reflector to bounce light, and sometimes I don’t. It really just depends on a few factors. It depends on who I’m shooting and what they need the photos for, it depends on the time of day, and it also depends on the weather.
For example, if I’m shooting an actor’s headshot and looking for a very theatrical look, I won’t use a reflector because I like how the light will drop off on one side of their face. For me it creates a more dramatic effect.
On the other hand, if I’m shooting an actresses’ commercial headshot, then I might use a reflector, because I’m going to want to use that light to fill in all of the subtleties on her face.
For me, I like seeing my commercial headshots come across as light, approachable, and friendly. If you don’t have those three factors working in conjunction with one another for a commercial headshot, then ultimately you have not achieved what a commercial headshot should be.
I always tell both myself and my client: “think toothpaste commercial.” It works great to lighten the mood, and I think they understand what we’re after in terms of mindset and headshot. Fun, friendly, and marketable. Those are the adjectives that come to mind.
Tell us about the gear your use to light your shots
One of my favorite new techniques in shooting models is using colored gels to illuminate the background.
I used to think that photography was all about the subject, then I thought that photography was all about the equipment, but today what I have come to realize is that great photography is really all about lighting.
That’s what I enjoyed so much about Phil’s course on shooting with speedlights. Prior to that course, I didn’t really understand how composing a shot actually has more to do with how you light it than who you’re shooting.
I started out modestly with my lighting equipment. I first purchased a set of studio strobes with umbrellas to defuse the light. At that time I simply couldn’t afford to buy the Canon speedlights, so I had to go economical at first, but I learned many lessons from buying those cheap studio strobes.
The first lesson is that when you buy cheap strobes they usually come with extremely cheap light stands that aren’t very durable. Secondly, when you buy cheap studio strobes you usually have to buy cheap transmitters to fire the strobes, which I learned very quickly were unreliable.
Eventually, after a few months of bearing with those cheap strobes, I invested in one quality studio strobe with a very durable light stand that was able to hold a huge softbox. This helped me in several ways, but one of the most beneficial things about buying a quality strobe is that I was able to control the output of light that it fired. Before, I simply had to move the cheap strobes closer or farther away from my subject to achieve the amount of light I wanted to be emitted.
It was really awful looking back on it, but sometimes you have to do what you have to do to if you want to shoot indoors.
So a few months passed, and I was able to afford to buy another quality strobe which I used primarily as a fill light. I would’ve loved to have been able to afford $500 Canon Speedlites, but that just wasn’t feasible at the time.
Ultimately it was more beneficial for me to learn and master a one-light setup, and then after a few months learn to master two light setups.
For example, if a new photographer went out and bought four or five speedlights or strobes right off the bat, I guarantee that they wouldn’t fully understand the dynamics of how each strobe or speedlight affects the shot.
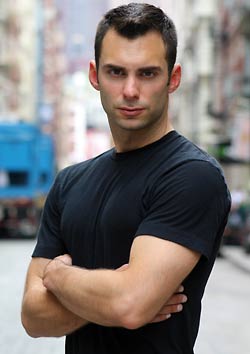
Describe the three photos you included here
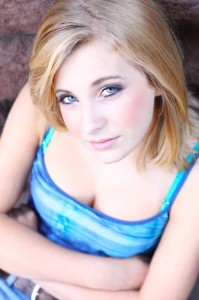
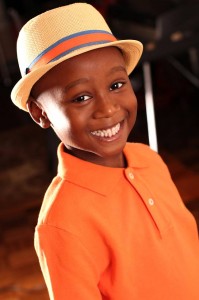
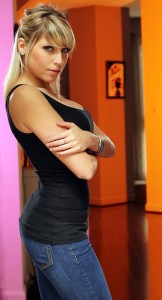
These photos have three different lighting schemes.
The girl who’s wearing a blue shirt was shot outdoors with no reflector, no strobes, and she is only being shot in the shade.
Outdoor shots depend on the time of day to get great lighting. You simply just need to experiment and find what works for you in the geographical area that you’re shooting.
The photo of the young boy wearing the hat was an example of a headshot that I did with a two light setup.
My main light is coming from the front right side of the frame and my fill light is coming in from the opposite side, like a sandwich.
I tend to use this lighting scheme often because I like how the light will wrap around the back of someone’s head and onto their jaw. I chose not to light the background behind him because I wanted to put most of the attention on his face.
The final photo I have included is a shot of a girl wearing a tank top standing up against a wall with the background illuminated in different colors. When I’m shooting models I like to use gels over my strobes or speedlights to create a vivid background.
There are actually five lights at work in this shot. The main light is illuminating her face from the front right of the frame. Behind her about three feet above her head on both sides are two lights pointing down, providing rim lights around her head and body.
This creates separation between her and the background. On the floor pointed upwards behind the two rim lights are strobes that are covered one with an orange gel and the other with a purple gel. I just think that they make the shot pop more, and I tend to use gels more and more in my photography. Remember, it’s all about the lighting.
How did you learn theses techniques?
When I first started out, I purchased Phil’s off-camera-flash headshot course because I needed some guidance with understanding basic lighting in photography.
Everybody knows that you can go to YouTube and search a plethora of different tutorials from a bunch of different people; however, I wanted to learn all of these different tips from the same person. Three years later, I’m so glad that Phil happened to be that person.
I cannot think of a more fundamental and straightforward way of learning lighting in photography than what Phil’s course taught me. The way that the course is designed I didn’t feel rushed, and I also felt like I was absorbing everything that he was teaching because of the pace that he was creating for the course itself.
One thing that I thoroughly enjoyed about Phil’s course has actually more to do with him than the subject matter itself. I dare say that Phil has a “Mr. Rogers” style about him that is very unassuming, approachable, and easy to listen to.
I can honestly say that if it wasn’t for Phil’s course on lighting that my businesses would not be in existence today, and that is the absolute truth.
I have expanded into many different types of photography these days covering actors and models, corporate professionals, senior portraits, and real estate photography. The lessons that I learned from Phil’s course gave me the foundation to build a successful photography business many times over. I would feel comfortable putting my head shots up against anyone’s at this point, and Phil would be one of the top people to thank for that.
[Phil replies — “Thanks, man, but you’re making me blush here.”]
What advice would you give to aspiring photographers?
Photography for me is all about experience and putting the time in. You’re never going to shoot magazine covers right off the bat, it just doesn’t work like that.
The best piece of advice I could give young photographers is to simply shoot as many people as possible, and gradually over time you will learn what works, what doesn’t work, and you’ll start to develop your own style.
————–
[Phil again]
I think we can all learn a lot from Christopher. First, just look at his photos. You don’t get that kind of result without a lot of hard work, and he’s obviously putting in the work and paying his dues.
But even more, look at his ambition and hustle. He has been working hard, networking to get clients, putting the effort into a great website. And he’s already branching out! Not content to be the #1 headshot photographer in Philly, he now has launched additional websites for school portraits, corporate headshots, and real estate photography.
By this time next year, I expect he’ll be mayor of Philadelphia as well.
Seriously, what an inspiring role model for up-and-coming photographers.
Christopher, thanks for sharing your story.


As a resident of Canada, I was blocked from viewing Christopher’s main website. I was able to view the other sites and I noticed that many of the gallery included Headshots where a portion of the head has been cropped. Personally, I am a fan of this look as it draws you right into the subject’s face. Many others would disagree. Any thoughts?
Hi Phil, just a quick note to say that I enjoyed this post and am pleased to see Chris’s drive! Actually, my journey in professional photography has been quite similar to Chris’s path. I, too, now focus on executive headshots and especially real estate and commercial photography, as well!
I must tell you that the fundamental lessons that you teach in your lighting courses about ratios and using different power settings in off-camera flashes to affect the quantity and quality of light, have been applicable to my real estate work as well. And even though I’ve taken numerous follow-up courses from alternate sources, specifically aimed real estate photography, the fundamentals are always there…thanks! Keep up the good work!
If you’re interested in seeing my headshot and RE work, go to http://www.tc-rephotography.ca. Thanks again!
Tony C, your real estate photography is stunning, thanks for sharing! — Phil
Thanks for the compliment, Phil…I really appreciate it!! 🙂
Dennis, yes, using the “rule of thirds” and placing the eye that is typically closest to the camera, in that spot,where the “thirds” intersect, will crop off the top of the head. That’s OK … it’s actually a best practice! Good headshot shooters will do this regularly, unless they’re required to do otherwise by certain guidelines (e.g., when a portrait is going to be used in a business card and other promo materials, many real estate agencies want to see space all around the person’s torso).
Impressive and a humble beginning. One paragraph that says it all to me was this one:
“I cannot think of a more fundamental and straightforward way of learning lighting in photography than what Phil’s course taught me. The way that the course is designed I didn’t feel rushed, and I also felt like I was absorbing everything that he was teaching because of the pace that he was creating for the course itself.
One thing that I thoroughly enjoyed about Phil’s course has actually more to do with him than the subject matter itself. I dare say that Phil has a “Mr. Rogers” style about him that is very unassuming, approachable, and easy to listen to.”
I must admit that after Phils course and spending only $300 (since I already had a good cam and flash), I took my portrait to a new level. and now some boudoir.
Good work Phil!
One happy customer…
Dr Louis Cardinal, Cornwall Ontario
Hi Christopher:
Thank you for earlier reply to my question. I persisted and I was able to view your main website. I am certainly impressed with many of your photos. In many cases the eyes really draw you in!
I note in your pricing that you often will provide only one photo with PP and then give the others on a disk or via email. When you shoot, do you shoot in RAW and then convert to jpeg or tiff for the disk or do you just shoot jpeg in camera?
Phil, thank you for bringing Christopher to our attention. His work is tremendous. I too have viewed your portrait course (several times) and it convinced me to go the speedlight route.
Dennis
I too did Phil’s course earlier in the year and found it both instructive and inspirational.
I took some headshots for the portfolio of a drama student friend of my daughter using Phil’s techniques. Having posted these on my Facebook page I am now being sought out by 3rd year drama and performing arts students of the local University (Anglia Ruskin in Cambridge, England), all of whom have to have headshots for their course. One of those is actually a young lady from Tucson, AZ who has come over to England to study drama like Christopher did.
I must endorse everything Christopher says about Phil’s course in the above piece and wish him all of the success he deserves for his skill and commitment to helping people progress with their photography.
As a new comer to Phil’s tutorials and online material, this post gives me more motivation to move forward in the field of professional photography and the success that can came from the profession.
Phil, during your Q&A with Chris, did you discuss technical details like what lens or lenses Chris uses to capture these amazing shots along with the mentioned light details?
Hi guys and thanks for the kind comments. I will try and answer a few of the questions in the comments section as best I can. In terms of chopping off the top of peoples heads in the majority of my head shots, I do that for a couple reasons. The first reason being that I just don’t feel that it’s necessary to capture every hair on the person’s head. As an actor, I know that the most important thing in a headshot is the eyes. When casting directors see head shots they’re looking for something about the photo to draw them in, and that isn’t going to be the top of someone’s head, it’s always the eyes. So cutting off the top of someone’s head for me, is perfectly fine because everybody who looks at the photo knows that it’s still there, hence making it somewhat irrelevant.
As for lenses, when I shoot on a crop censored camera I like the 50 mm prime lens. If I happen to be shooting on a full frame sensor camera, I have to go with the 85 mm prime. These two lenses are the best portrait lenses for their respective cameras, period. And 99% of the time you’re not going to be blowing these portraits up to Billboard size, so you can get away with using a crop sensor camera for 90% of your portrait work. If you start getting commercial clients, then that’s a different story. A full frame sensor camera might not even do the job for some of the bigger commercial work, you might have to rent a medium format camera like a Hasselblad.
99% of the time I shoot in JPEG. There’s a number of different reasons why, but the main one is because it’s easier in postproduction to just send my clients JPEG’s. If you’re really super picky then shoot raw, but I feel if you’re going to be shooting in raw then you should also have a very firm grasp on Photoshop as well. If you’re not advanced at Photoshop, then there really isn’t any reason to be taking photos in raw, just make it easier on yourself and shoot straight JPEG’s. Sending your clients a disk full of raw files or emailing them a bunch of raw files will only get confusing to the average person who won’t even be able to open up the files, bypass all that nonsense and possible headaches and just send them JPEG’s.
Best,
CD
Christopher, while I can appreciate and respect your drive/ambition, I would respectfully disagree with a couple of the points that you’ve made in your most recent post. First, while a 50mm prime lens might be called on every-now-and-then for portrait work, it often can cause distortion to a human face in a close-up, such as would be required for an actor’s headshot. That’s why top portrait photographers in the world (Cliff Mautner, David Ziser, Joe McNally to name but a few) all use 24-70mm lens and, most usually, a 70-200mm lens. In fact, reviewing some of their articles/courses shows that they prefer to shoot at the longer end (150-200mm) because the compression achieved at this longer focal length tends to flatter the subject more — particularly women. And, if I recall, Phil Steele himself uses as 70-200 in his videos! 🙂
I’m also curious as to your comment about crop sensors. Specifically, you said that “you can get away with using a crop sensor camera for 90% of your portrait work”! With all due respect, I think this is incorrect information. Any one of the photographers that I’ve mentioned above could shoot circles around most photographers in the world using a camera with a crop sensor (indeed, they could do so with a point-and-shoot camera or an iPhone!) because they are masters in how to use and manipulate light. A crop sensor has nothing to do with the quality of the shot! I’d also like to hear more on why you think a commercial photography requires the rental of a Hasselblad – a camera that can retail for up to $45K.
Finally, I was most taken aback by your advice to shoot in JPEG because it’s “easier to send to the client.” Virtually every great photographer that I’ve studied shoots in Camera RAW because there’s just SO much more data available to them than can be worked with in post. Yes, I agree that it’s more convenient and preferable to send a client a JPEG (or a TIFF file) but only AFTER you’ve completed your editing. I would suggest that you START your editing with a RAW file. I would also disagree with your assertion that one needs a “very firm grasp on Photoshop”, as you put it, to work with a RAW file. In fact, if beginners would just start shooting in RAW more often, they’d see how easy Camera RAW adjustments can be. Indeed, by just moving a few sliders, one can control highlights, shadows, contrast, clarity, vibrancy and so much more. But most importantly, one can correct White Balance, which is absolutely *vital* in all photography — especially in portraiture!
Thank you for your time in writing your post…I look forward to your reply.
Tony
Am a great novice and about to launch myself into the world of photography. Had purchased a Nikon Camera and about starting the learning process. Phil, I thank God I stumbled on your great online tutorials.
In years to come, I know I will write and share my own success story with you. I love photography, its my life, my passion.
Thanks for everything.
Great read!!! This just upped my passion to succeed 20 fold!!! I’m ready to go shoot something and I just got back from a senior shoot using the techniques from the same video. THAT video gave me the confidence to go out with my one speed light an umbrella and a reflector. It WORKS!
Congrats to you Christopher on your success! I wold like to chat with you about real estate photography some time soon if you don’t mind. I’m in a state out west whree they are building like crazy and the shots for the printed material and online material are terrible with all kinds of perspective distortion and bad lighting. I’m confident I could do better… anyway. Let’s chat if you have the time.
Again, congrats. and all the best!
Todd